
 | Home > Td5 > 110 Mid-Crossmember Replacement |
 
|
|
|
| Intercept Member Since: 27 Feb 2017 Location: Suffolk Posts: 587  
|
As with many things LR, it started as a little job... The intention was to repair the electrolytic corrosion that had eaten away the aluminium around the body to chassis bolts under the 2nd row seats, adding some inter-metal insulation at the same time to prevent its recurrence. However, whilst doing that I found a 2" hole in the mid-crossmember which couldn't be ignored. Fortunately it is bolted to the chassis but a bit of googling revealed that replacement of this part wasn't much fun because the upstand brackets prevent it from being slid out/in. However, YRM and others sell a version with bolt-attached body brackets which means that the main part can be inserted without body removal. But you do need to remove the floor panel.
https://yrmit.co.uk/product/110-mid-crossm...-defender/ As I'd already spent a good few hours a while ago replacing all the floor fixings the floor removal was easy enough. The worst part of the overall job was undoing/cutting the 17 year old bolts holding the old member in place. After that the installation of the new part was very simple - all the bolt holes were in the right place. One slight complaint of the YRM kit is that some of the supplied bolts are a bit long - see photos, but overall I was impressed with the quality of the product. 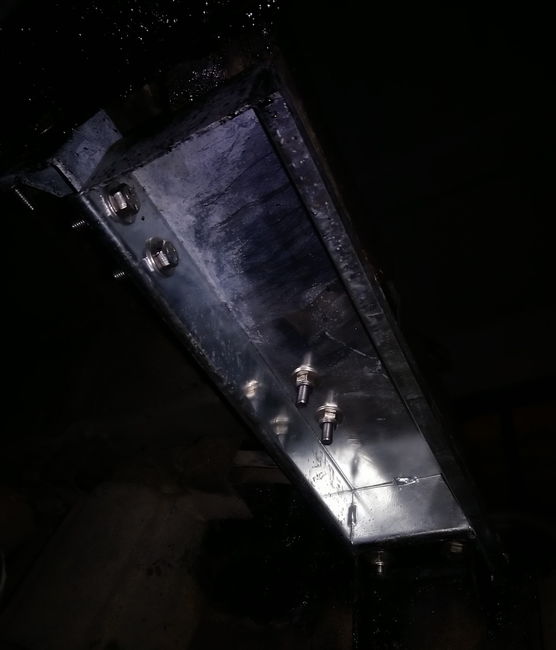 Click image to enlarge Click image to enlarge Click image to enlarge |
||
|
| bankz5152 Member Since: 02 Feb 2017 Location: South London/North Kent Posts: 2209  
|
Good to know! Mine will need doing soon as well.
How long did it take you in the end? |
||
|
| NineCherries Member Since: 10 Aug 2019 Location: Falkirk Posts: 59  
|
good to know as Its a job i'll need to do too. Do you need to take off the little triangle body panel at the bottom (behind the back row door) to allow the new yrm one to slide in? or is all done from above by removing the rear floor?
|
||
|
| Intercept Member Since: 27 Feb 2017 Location: Suffolk Posts: 587
|
No external bodywork needs to be removed. The crossmember is inserted from inside the cabin once the floor is out. A bit of lube on the fuel pipes makes it easier to slide the new member into place. The sill brackets are bolted on from underneath afterwards. |
||
|
| NineCherries Member Since: 10 Aug 2019 Location: Falkirk Posts: 59
|
brilliant,thanks for confirming.
|
||
|
| rustandoil Member Since: 08 Sep 2012 Location: Cotswolds Posts: 815  
|
Just looking at doing this Job on my Double cab..did you bother with the anti corrosion gaskets that YRM offer?
|
||
|
| Intercept Member Since: 27 Feb 2017 Location: Suffolk Posts: 587
|
I didn't use the YRM gaskets because I didn't spot them when placing the order. However, I did make my own from some rubber sheet. Additionally I fitted some of these sleeve washers to prevent the bolt from electrically connecting the aluminium body to the steel bracket. You need both to properly isolate the 2 metals.
Click image to enlarge https://www.ebay.co.uk/itm/332762458159 You can just see them under the bolt heads here: Click image to enlarge |
||
|
| rustandoil Member Since: 08 Sep 2012 Location: Cotswolds Posts: 815
|
Excellent info' I will get some of those insulating bushes too
|
||
|
| 4RF RDS Member Since: 19 Jul 2015 Location: Ottawa Posts: 968  
|
Would it be asking too much if you could take a picture showing exactly where these bolt heads are located when the job is done? (further back for orientation). Many thanks if you can, if not no worries. Cheers 2010 Range Rover MkIII Autobiography Super Charged (Idris) 2003 Range Rover Mk III (Desmond FitzWilliam) 2000 Defender 110 CSW TD5 (CTX) 1992 Range Rover Classic (Lizzy) 1972 Series III 300 Tdi (Stanwood) 1967 MGB GT Every normal man must be tempted at times to spit on his hands, hoist the black flag, and begin to slit throats. H. L. Mencken (1880 - 1956) |
||
|
| Intercept Member Since: 27 Feb 2017 Location: Suffolk Posts: 587
|
It is probably easier to explain... If you're sitting in the inner/outer 2nd row seat, these bolts are behind your heels. The rivets in my photo are attaching the repair plate used to replace the corrosion caused by the old bolts. |
||
|
| 4RF RDS Member Since: 19 Jul 2015 Location: Ottawa Posts: 968
|
Perfect, understood. Thank you. Was just wondering where those were for when I’ll do mine at some point. Good post BTW
Cheers 2010 Range Rover MkIII Autobiography Super Charged (Idris) 2003 Range Rover Mk III (Desmond FitzWilliam) 2000 Defender 110 CSW TD5 (CTX) 1992 Range Rover Classic (Lizzy) 1972 Series III 300 Tdi (Stanwood) 1967 MGB GT Every normal man must be tempted at times to spit on his hands, hoist the black flag, and begin to slit throats. H. L. Mencken (1880 - 1956) |
||
|
| lightning Member Since: 23 Apr 2009 Location: High Peak, Derbyshire Posts: 3048
|
Looking to do this job this weekend, already got the floor panel out, l received the replacement crossmember and separate brackets from YRM (but no bolts were included with mine)
My 110 has two brackets on top of the chassis which look like they would prevent the new crossmember from sliding in to place. These brackets are not used on my 110. Would l need to saw them off? I don’t want to take it in to the garage as l’ve not much money at the moment. Click image to enlarge |
||
|
| lightning Member Since: 23 Apr 2009 Location: High Peak, Derbyshire Posts: 3048
|
Well, l managed to get this job done today, l had to borrow an angle grinder to get the old part out, but after that it was just a case of re-assembly, although it took me most of the day.
The body dropped very slightly on the O/S when l removed the crossmember (rear door catch was mid aligned) so l jacked it up a little with a trolley jack and bricks, until the bolt holes lined up. After that it was perfect. The new part slotted straight in with a couple of light taps from the hammer. I replaced most of the bolts from my spares boxes, including new floor screws. I had to cut the corners off the two brackets on top of the chassis to get the new crossmember in. But they are not used on my vehicle so that was OK. Click image to enlarge Click image to enlarge Click image to enlarge |
||
|
| blackwolf Member Since: 03 Nov 2009 Location: South West England Posts: 17715 
|
Be careful jacking anything using bricks, it's a definite no-no. They tends to crumble which will cause the load to drop, and this has killed people in the past. Use wood blocks instead.
|
||
|

|
|
| All times are GMT + 1 Hour |
< Previous Topic | Next Topic > |
Posting Rules
|
Site Copyright © 2006-2025 Futuranet Ltd & Martin Lewis
![]()
